Navigator Panel
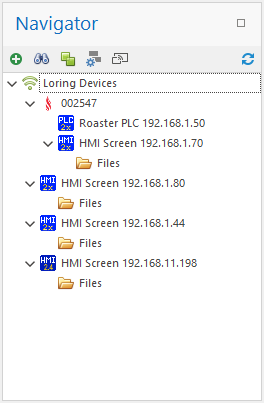
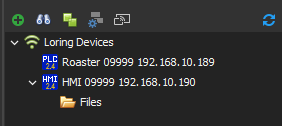
The Navigator panel in Roast Architect offers access to all Loring Roasters on your network through Ethernet communications for Loring Roaster systems. Navigator lists the Roaster machines recognized by Roast Architect.
Navigator Icons
The icons you will see in the Navigator panel are as follows:
 - All Opened Files Tree - This tree holds all Roast Architect recognized files.
 - All Loring Devices Tree - This tree holds all Roast Architect recognized devices (PLCs, HMI, etc.).
Recognized Device Icons
 - 2.X based PLC - This identifies an H2/BRX Processor PLC.
 - 2.X based HMI - This identifies a Beijer iX Pro series HMI.
 - 1.X based PLC - This identifies a DL205 series PLC.
 - 1.X based HMI - This identifies a Beijer T100 series HMI.
 - UNKNOWN Device - This identifies a device that shows a connection to the LAN but is not recognized as a Loring Device.
Device Group Icons
 - 2.X Recognized Loring Roaster Group - When a 2.X PLC and a 2.X HMI are grouped together, they are recognized as a 2.X based Roaster. Roast Architect has functions that make use of this association. The flame icon will appear if the group contains a PLC device along with a HMI device.
 - Device Group - General device group. These groups are available to associate Loring recognized devices.
File Icons
 - Files folder - This icon represents a folder containing files associated with the HMI screen.
 - Roast Architect File - This shows a recognized Roast Architect file.
The Navigator Tool Bar
The Navigator Tool Bar assists in adding and organizing Loring Roaster devices, such as Loring PLCs and HMI screens.

Manually Adding A Device
You can manually add PLC and Roaster devices by entering the IP address of the Roaster. From the Navigator tool bar, find the button with the icon  . Clicking this button will prompt you to enter a valid IP address for the PLC or HMI. A small prompt box will appear and ask you for the valid IP address of the device.

Upon entering a valid IP address, Roast Architect will automatically try to identify the device and display the accurate information corresponding to the entered device. The identified devices will be listed in the main tree within the device section of the Navigator panel.
Grouping Devices
Connected devices can be grouped and organized into device groups for convenient organization. A device group allows users to associate different devices into a single common group. For example, a PLC and HMI can be combined to represent a Roaster. To create a group, locate the button with the icon in the Navigator toolbar. Clicking this button will create a group node in the list. Double-click on the group node to rename it. Enter the desired name, then press Enter to change the group's name, as shown in the images below.
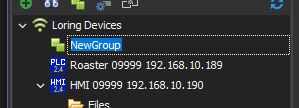
Next Drag and Drop any of the listed devices into the Device Group folder.
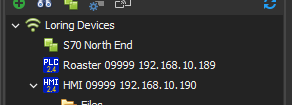
The Once organized the system should look similar to the following picture.
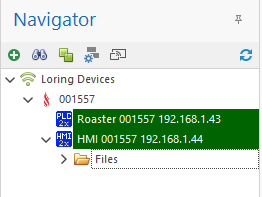
Notice how the folder icon change to a  icon. This indicates that the folder contains a PLC and a Screen which when combined designates a v2 S-Series Roaster. The v1 series does not change its icon and retains the default Device Group icon
 .
.
Automatic Loring Device Detection
Roast Architect can auto-detect all Loring Ethernet devices that are present, and turned on for a given LAN. To perform this feature, the PC that must be on the same LAN as the Loring equipment. You may need to turn off your firewall for this feature to work correctly. To start the auto-detect process click the scan and refresh button in the navigator tool bar. This will show a wait-cursor while Roast Architect scans the network for Loring Ethernet Devices. After a short moment the system should return all recognized Loring Ethernet devices detected on the LAN.

Scan and Refresh Button
Removing a Device from the Device Tree
To remove a device from the Device Tree list, select the device to be removed, right click and select Remove from the context menu.
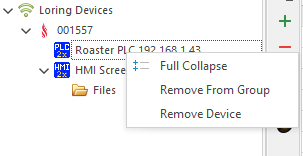
The device will then be removed from the list.
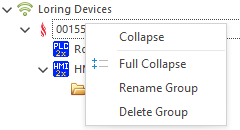
Deleting a Group
To delete a group from the Device Tree list select the Device Group folder and right click on it. A context menu will appear. Select Remove. The devices contained will NOT be deleted
Navigator Functions
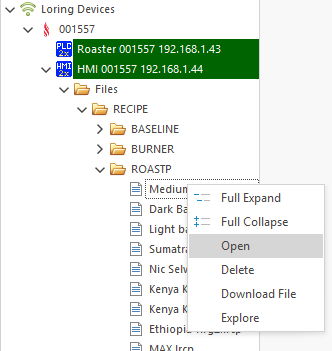
Open a File On the Screen
Files can be opened by selecting the file of interest, right clicking the file, and selecting Open from options menu.
Close an Opened File
Files that are listed under the Opened Files tree list can be closed by selecting the file of interest, right clicking the file, and selecting Close from the context menu.
If the file was originally on the screen, the updated file will automatically be pushed back to the screen.
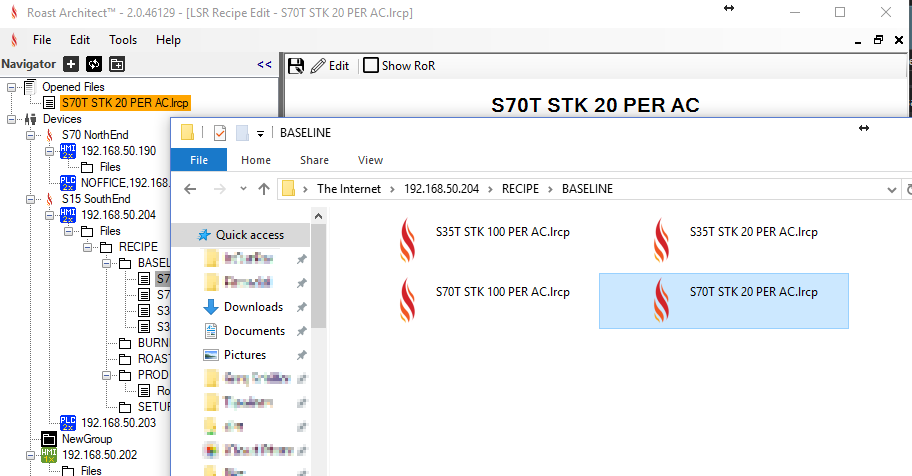
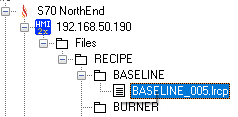
Browse to a Remote File
Windows Explorer will open with the correct directory being selected and the file of interest selected as the image below (image shows a remote HMI file.).
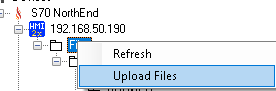
Uploading a File to the Screen
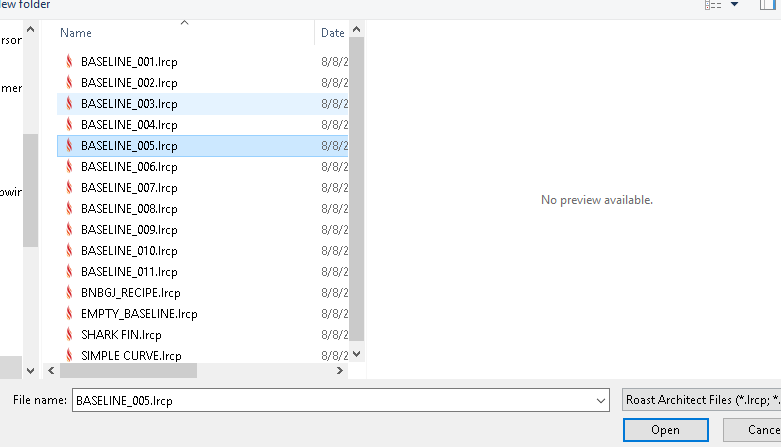
Files get uploaded to the HMI screen by performing a right click on the HMI Files folder to show the folder options menu. Select Upload Files which will open a Open File dialog form.
Select a file to upload to the screen. The files will automatically be sorted by extension type to their correct folders. Profiles will be sorted into their correct sub-folders based on their type (Roast Profile or Burner Recipe).
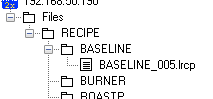
After the file uploads, the file tree will refresh, showing the file in its correct location.
WARNING - IF A FILE ON THE SCREEN HAS THE SAME NAME AS A FILE BEING UPLOADED, THE FILE ON THE SCREEN WILL BE OVERWRITTEN. THIS CANNOT BE UNDONE.
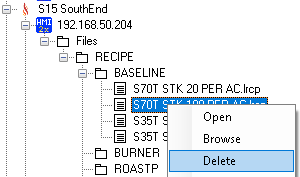
Deleting a File from the Screen
To delete files off a screen, select the file of interest, right click on the file, and select the menu option Delete. The file tree will refresh and show that the file was deleted from the screen.
Downloading a File from the Screen
Files located on the screen can be downloaded by selecting the file of interest, then right clicking the file and selecting the Download menu option.
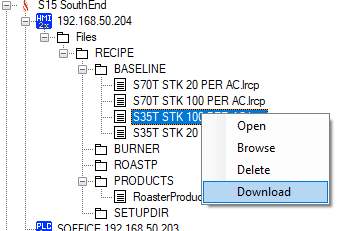
A file Save As dialog will appear, allowing you to pick the file name and location to download to.

Navigator Double Click Functions
Open Files
Files can be opened by navigating to the file of interest and double clicking them.
Double clicking will open the file in Roast Architect.